Spring Boot 3 - optimal way to send JSON data with binary files in request
In this article, we would like to show how to optimal way to make POST request with JSON data and binary files in Spring Boot 3.
The JSON format does not allow direct transmission of binary files.
There are available solutions:
- quite optimal: encode binary files using Base94 (as improvement to Base64) and send them inside JSONs,
- super optimal: use
multipart/form-dataasContent-Typeand send JSON and binary files inside parts.
The article presents multipart/form-data approach.
Example project
In the project JSON part has name json and names of file parts use file-* pattern.
The project structure
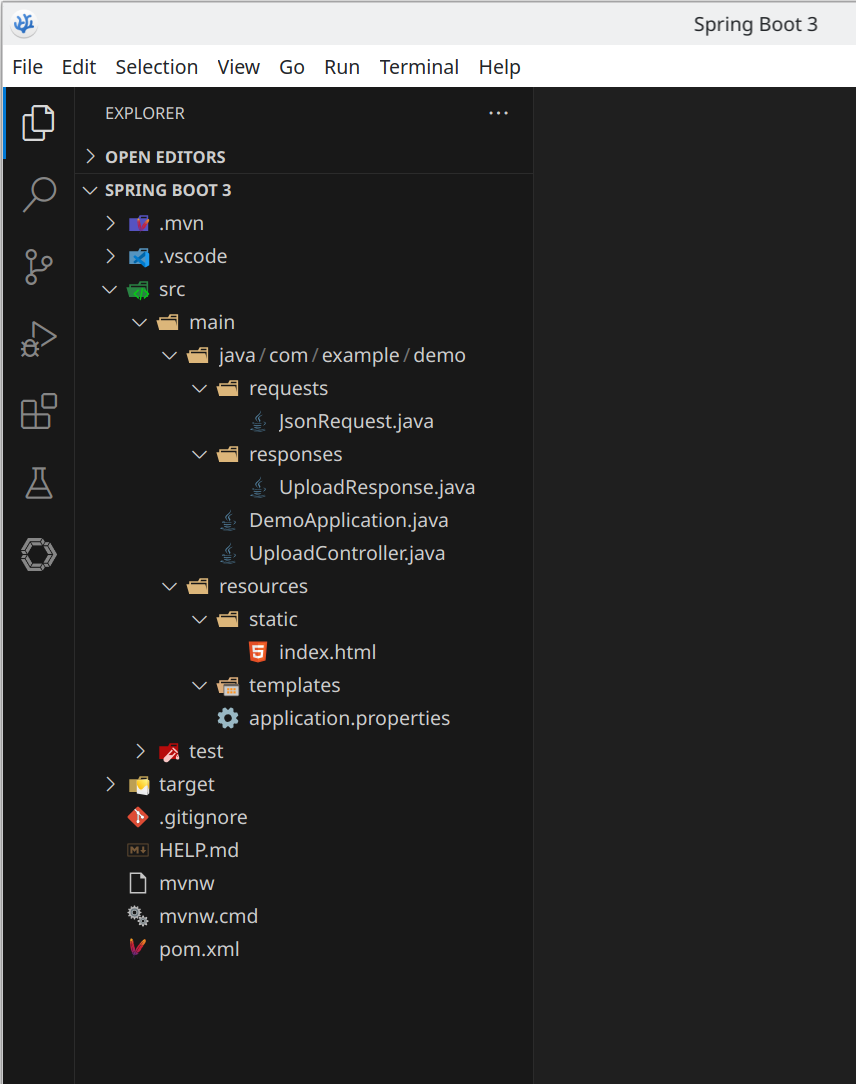
The project files
src/main/resources/application.properties file:
spring.application.name=demo

spring.servlet.multipart.max-file-size=10MB
spring.servlet.multipart.max-request-size=10MB
src/main/resources/static/index.html file:
<!doctype html>
<html>
<body>
  <script>

    const ENCODER = new TextEncoder();  // it uses UTF-8

    // Source: https://dirask.com/snippets/JavaScript-convert-object-to-Blob-application-json-charset-UTF-8-DZNVXD
    //
    const createBlob = (object) => {
        const json = JSON.stringify(object);
        const parts = [
            ENCODER.encode(json)
        ];
        const options = {
            type: 'application/json;charset=UTF-8'
        };
        return new Blob(parts, options);
    };

    const sendPost = async (url, data) => {
        const response = await fetch(url, {
            method: 'POST',
            body: data
        });
        return await response.json();
    };

    const handleSubmit = async (event) => {
        const elements = event.elements;
        const jsonData = {
            property1: 'value-1',
            property2: 'value-2',
            property3: 'value-3',
            // Put more properties here ...
        };
        const file1Element = elements.namedItem('file-1');  // <input type="file" name="file-1" />
        const file2Element = elements.namedItem('file-2');  // <input type="file" name="file-2" />
        const file3Element = elements.namedItem('file-3');  // <input type="file" name="file-3" />
        // Put more files here ...
        const formData = new FormData();
        formData.append('json', createBlob(jsonData));
        formData.append('file-1', file1Element.files[0]);
        formData.append('file-2', file2Element.files[0]);
        formData.append('file-3', file3Element.files[0]);
        // Put more files here ...
        return await sendPost('/api/backend', formData);
    };

  </script>
  <form action="javascript: void 0;" onsubmit="handleSubmit(this)">
    File 1: <input type="file" name="file-1" /><br />
    File 2: <input type="file" name="file-2" /><br />
    File 3: <input type="file" name="file-3" /><br />
            <!-- Put more files here ...   -->
    <button type="submit">Send</button>
 </form>
</body>
</html>
Hint: to distinguish what file is related with what part in JSON data, we can put file names inside JSON data.
src/main/java/com/example/demo/UploadController.java file:
package com.example.demo;

import org.springframework.http.MediaType;
import org.springframework.stereotype.Controller;
import org.springframework.web.bind.annotation.PostMapping;
import org.springframework.web.bind.annotation.RequestPart;
import org.springframework.web.bind.annotation.ResponseBody;
import org.springframework.web.multipart.MultipartFile;

import com.example.demo.requests.JsonRequest;
import com.example.demo.responses.UploadResponse;

@Controller
public class UploadController {

    @PostMapping(
        value = "/api/backend",
        consumes = MediaType.MULTIPART_FORM_DATA_VALUE,
        produces = MediaType.APPLICATION_JSON_VALUE
    )
    @ResponseBody
    public UploadResponse handleForm(
        @RequestPart("json") JsonRequest jsonRequest,
        @RequestPart("file-1") MultipartFile requestFile1,
        @RequestPart("file-2") MultipartFile requestFile2,
        @RequestPart("file-3") MultipartFile requestFile3
        // Put more files here ...
    ) {
        // ...

        return new UploadResponse(true);
    }
}
src/main/java/com/example/demo/DemoApplication.java file:
package com.example.demo;

import org.springframework.boot.SpringApplication;
import org.springframework.boot.autoconfigure.SpringBootApplication;

@SpringBootApplication
public class DemoApplication {

	public static void main(String[] args) {
		SpringApplication.run(DemoApplication.class, args);
	}
}
src/main/java/com/example/demo/requests/JsonRequest.java file:
package com.example.demo.requests;

import lombok.Getter;
import lombok.Setter;
import lombok.NoArgsConstructor;
import lombok.AllArgsConstructor;

@Getter
@Setter
@NoArgsConstructor
@AllArgsConstructor
public class JsonRequest {
    String property1;
    String property2;
    String property3;
    // Put more properties here ...
}
src/main/java/com/example/demo/responses/UploadResponse.java file:
package com.example.demo.responses;

import lombok.Getter;
import lombok.Setter;
import lombok.NoArgsConstructor;
import lombok.AllArgsConstructor;

@Getter
@Setter
@NoArgsConstructor
@AllArgsConstructor
public class UploadResponse {
    boolean result;
}
pom.xml file:
<?xml version="1.0" encoding="UTF-8"?>
<project xmlns="http://maven.apache.org/POM/4.0.0" xmlns:xsi="http://www.w3.org/2001/XMLSchema-instance" xsi:schemaLocation="http://maven.apache.org/POM/4.0.0 https://maven.apache.org/xsd/maven-4.0.0.xsd">

	<modelVersion>4.0.0</modelVersion>

	<parent>
		<groupId>org.springframework.boot</groupId>
		<artifactId>spring-boot-starter-parent</artifactId>
		<version>3.3.4</version>
		<relativePath/>
	</parent>

	<groupId>com.example</groupId>
	<artifactId>demo</artifactId>
	<version>0.0.1-SNAPSHOT</version>
	<name>demo</name>
	<description>Spring Boot - demo project</description>

	<properties>
		<java.version>17</java.version>
	</properties>

	<dependencies>
		<dependency>
			<groupId>org.springframework.boot</groupId>
			<artifactId>spring-boot-starter-web</artifactId>
		</dependency>
		<dependency>
			<groupId>org.projectlombok</groupId>
			<artifactId>lombok</artifactId>
			<optional>true</optional>
		</dependency>
		<dependency>
			<groupId>org.springframework.boot</groupId>
			<artifactId>spring-boot-starter-test</artifactId>
			<scope>test</scope>
		</dependency>
	</dependencies>

	<build>
		<plugins>
			<plugin>
				<groupId>org.springframework.boot</groupId>
				<artifactId>spring-boot-maven-plugin</artifactId>
				<configuration>
					<excludes>
						<exclude>
							<groupId>org.projectlombok</groupId>
							<artifactId>lombok</artifactId>
						</exclude>
					</excludes>
				</configuration>
			</plugin>
		</plugins>
	</build>

</project>
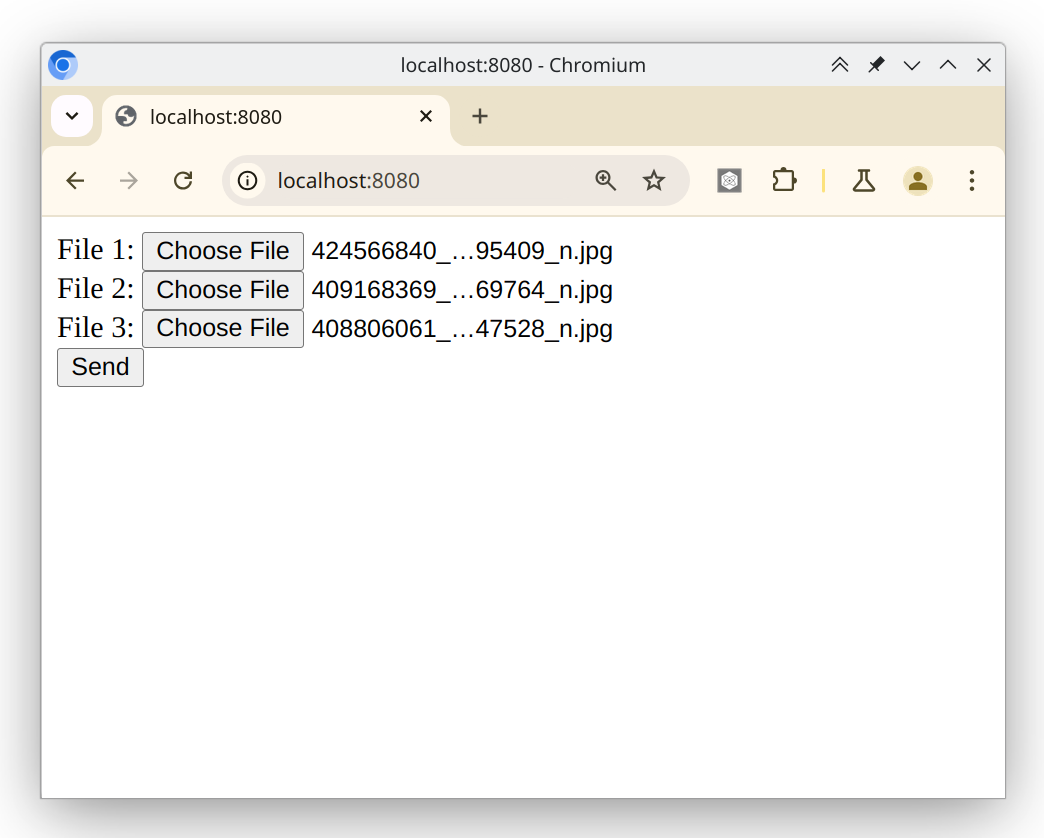
The final effect
Run the application and open http://localhost:8080 to see the effect.