Arduino UNO first application
This is the "hello world" example application for Arduino UNO board. You will learn how to create and upload first sketch (project) to the microcontroller.
Step 1. Download and install the Arduino IDE.
Arduino IDE can be downloaded from this web page.
Step 2. Open the Arduino IDE and write the example code.
Arduino projects are basically divided into two parts (functions):
setup()- put code here to run it only once, at the beginning of the program.loop()- everything putted here will be repeated many times until you turn off the Arduino.
The example code (bellow) enables communication between Arduino and PC (setup function) and next writes "hello world !" in infinite loop in every one second.
void setup() {
  // enable serial communication
  // between Arduino and PC, via USB cable
  Serial.begin(9600);
}

void loop() {
  // print (send) text "Hello world !"
  Serial.println("Hello world !");

  // wait 1 s (1000 ms)
  delay(1000);
}
Step 3. Save sketch.
Step 4. Connect Arduino UNO and PC via USB cable.
At the first time required drivers will be installed automaticly.
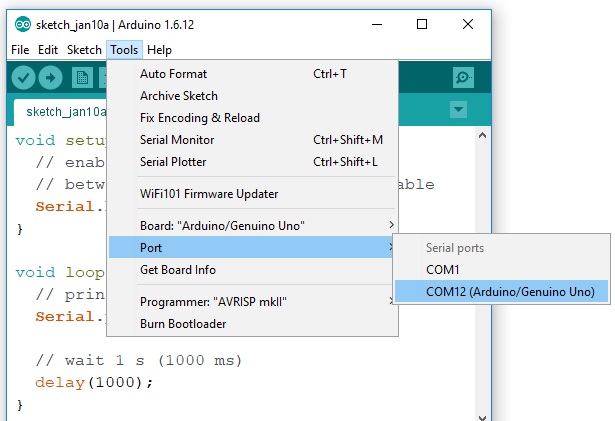
Step 5. Check COM port settings.
Go to Arduino IDE -> Tools -> Port and select proper COM port (containing the "Arduino UNO" text):

Step 6. Compile and upload project: Arduino IDE -> Sketch -> Upload.
Step 7. Open serial port monitor: Arduino IDE -> Tools -> Serial Monitor.
If everything is ok you will see new window with the text lines "Hello world!":